
If you would like to see more photos of the build then be sure to check out either Instagram accounts off_road_camper_build or the_pajero_sport
Where to start Pt.2……. After the framing was done, I needed to quickly work out where I was going to install all the electronics, water tank etc. This is probably something I should have done from the start, but who does not like a challenge?
This included a 12v electrical system, 40L fridge, interior and exterior lights, fans, sink and plumbing, water pump and the electrical control centre. Once this was all worked out I started on the walls.

I purchased a window and 2 access hatches online from a caravan retailer which from memory set me back about $500. This was the start of the spending and I’ll tell you it never stopped!

The door was purchased from Dunn and Watson which alone was just a tad over $700 and also a 70L water tank which fitted nicely under the bed framing along with the deep cycle battery.
From there I started working on the electronics which included a gang of 4 switches to operate lights and pumps etc. I quickly ran out and ended up installing another 4 gang switch panel. This particular panel has a built in circuit breaker. This was purchased from Jaycar. I installed a few other things, like the ability to see the battery voltage at the push of a button, accessories and USB ports too.


I managed to source some 10mm foil board insulation and lined it every place I could, especially the roof and the walls.
The foil board was easy to cut and install and came in large sheets which I had to cut in half just to get them home. They are lined with foil on one side and marked on the other side which is a great help when marking and measuring.
With all the walls on and all the holes cut for doors, drawers and access hatches I decided to start sealing the marine plywood. I head back to the fibreglass place to seek their expertise. I did not fibreglass the outside as all I wanted to do was seal and felt that I did not need to strengthen it anymore. It took a few goes to work out the best way to apply the resin and exactly how much to mix up at one time.
It probably took me about three to four weeks to apply the resin and in total I applied about three coats to ensure I did not miss any spots. I used a dark grey pigment with a silver pearl on the last coat.

I decided to resin and paint doors and drawers black to match the door and access hatches. I must have mixed up the black incorrectly as there ended up being marks in the black resin, which I covered up by painting over it in the end.
Now I probably made a mistake by painting the kitchen white and this may become evident over time but I really liked the contrast between the darker grey and the bright white.

Once the camper was towable, I took it to get weighed. The weight came in at 580kgs and I was confident that I could finish the project and still keep the camper under 750kgs (I was sadly wrong).

With the camper nearing completion, I purchased a foam mattress and had it cut to size.
I made up a bracket for my Kings awning and mounted it to the side of the camper. I then decided I would put a decent solar setup on the camper considering I was planning on going to some remote places and needed to ensure that my batteries were charged or could recover quickly. I decided to buy a Adventure Kings 160W Semi-Flexible Solar Panel. I got it home and quickly worked out that I could actually fit 2 nicely side by side. Back to the store I went. This will give me a total of 320W of solar which will pair nice with my Ctek DCDC system I was going to run.
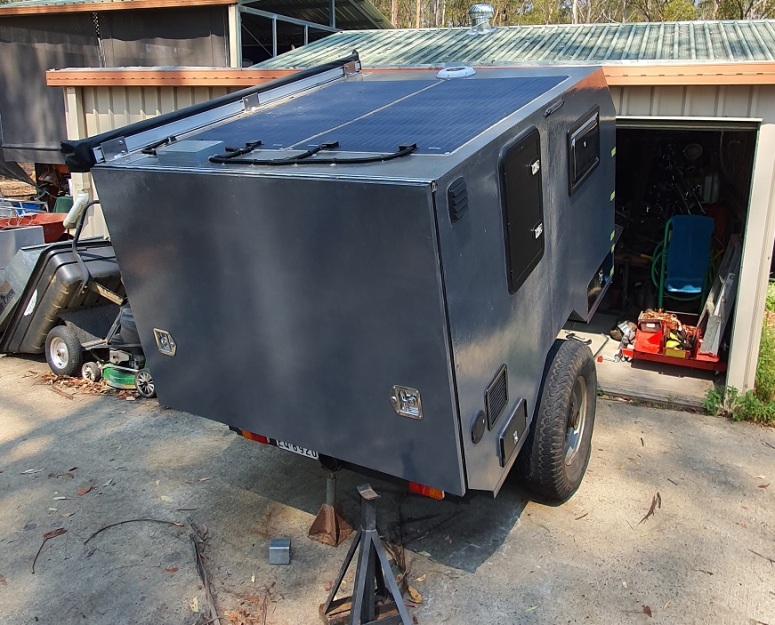
I then needed to get guards, the wheel carrier and my hot water system box made. I had the chequer-box made up by MW Toolbox Canopy & Trailer Centre.
I had a friend design and make up my guards and wheel carrier which really bought the look of the camper to exactly how I envisioned it 12 months ago when I first started building it.

Oh, I also replaced the jockey wheel and installed an off road hitch. As soon as it was completed I picked it up and headed straight for the weigh bridge. To be continued……

I love and hate reading your blog. You no sooner get me hooked and chomping at the bit for whats next to then read…. To be continued. Camper is looking great, cant wait to see how it finishes up.
LikeLike
Thanks mate, its is almost done! I promise.
LikeLike
Hi I really loved your article, it was very informative and will help me a lot with how I can handle my future plans. The camper is very well-planned. Brilliant idea. Kudos to you mate.
LikeLike
Wow, just saw you’re selling it?
LikeLike
Yeah. Priorities have changed slightly. I just don’t use it enough anymore. I would rather someone get the enjoyment out of it then it just sit on my block.
LikeLike